Showing posts with label diy. Show all posts

Thursday, February 4, 2016

DIY: Valentine's Day Filled Chocolates / Chocolates Rellenos de San Valentin

¡Me encanta este mes! Febrero se traduce automáticamente en San Valentín, la excusa perfecta para ser indulgentes con los chocolates, como si una razón fuera necesaria-. Si tienes una hora libre, tendrás tiempo de sobra para hacer tus propios chocolates rellenos para regalar o disfrutar en estos días de amor y amistad. ¡Anímate!
I love this month! February is automatically traduced to Valentine's Day, the perfect excuse to be indulgent with chocolate, as if any reason was necessary. If you have one free hour, you have more than enough time to make your own filled chocolates, to give or enjoy in these days of love. ¡Let's do it!

Necesitarás:

  • Cubierta para chocolate: Es diferente al chocolate convencional, búscala en los supermercados en el pasillo de repostería)
  • Molde de silicona: De corazones, ositos, alusivos a San Valentín (Mis moldes parecen de la estrella de la muerte de Star Wars, no hay nada más romántico que eso) 
  • Recipiente apto para microondas
  • Relleno: yo usé mermelada de cereza

You'll need:

  • Melting chocolate: Different from regular chocolate, probably available at the bakery aisle in your local supermarket.
  • Silicon molds: In valentine's day themed shapes, (Mine look like the death star from Star Wars, and there's nothing more romantic than that)
  • Microwave safe container
  • Filling: I used cherry jelly

El proceso:

1.     Reúne todos los ingredientes e instrumentos de antemano, asegura tener un espacio limpio para trabajar.
2.     Parte la cubierta de chocolate en cubitos  pequeños  y pon la cantidad que desees en el pocillo cerámico.
3.     Derrítelos en el microondas (en dos lapsos de 30 segundos) o al baño María. Mezcla hasta que quede líquido. Ten cuidado de no quemar el chocolate, pues se endurecerá (#TrueStory).
4.     Crea caparazones: Vierte el chocolate derretido en los moldes de silicona, Después dales la vuelta y deja que caiga el chocolate hasta que solo queden  cubiertas las paredes de las figuras. Retira los excesos de chocolate de la parte exterior del molde con una espátula y ponlo en la nevera por 10 minutos.
5.     Rellena los caparazones con mermelada.
6.     Llena que falta de los moldes con chocolate derretido y ponlos en la nevera por 10 minutos. ¡Ya están listos!
The making:
  1. Gather all the ingredients and instruments, have a clean space to work.
  2. Break the melting chocolate into tiny cubes, and put the amount you need in the ceramic mug.
  3. Melt in the microwave (in two intervals of 30 seconds each) or in a bain-marie. Stir until it is liquid, be careful not to overheat the chocolate.
  4. Create shells: Pour the melted chocolate in the molds, then put the mold upside down and let it drain until you're left just with the covered walls or shells of the figures, scrape the outside of the mold to remove any excess chocolate and put it in the refrigerator for 10 minutes.
  5. Fill the shells with jelly,
  6. Cover what is left of the molds with melted chocolate and put them in the refrigerator for 10 more minutes. They're ready!
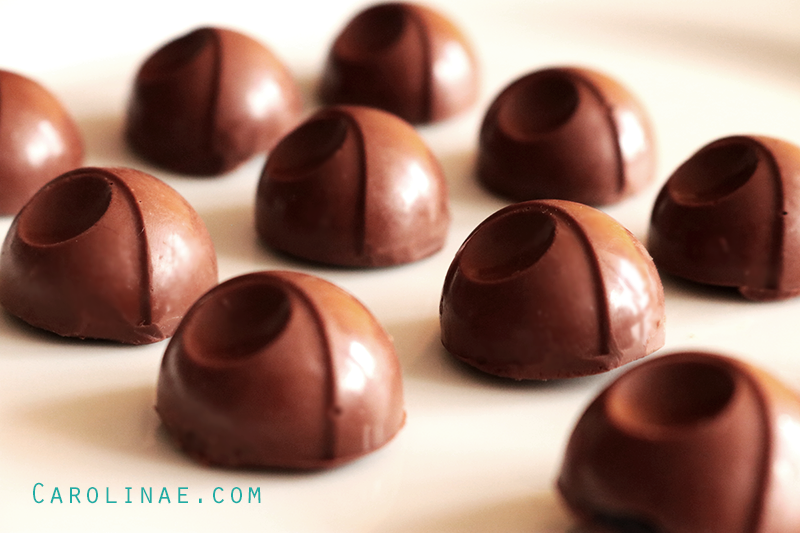
Otra opción es hacerlos sin relleno, para tenerlos aún más rápido, pero creo que esta es una alternativa mucho más interesante y deliciosa.
Another option is to make the chocolates without filling and have them ready even faster, but I think this is a more interesting and delicious alternative.


Me encantaría ver cómo salen los tuyos. ¿Qué harás para éste San Valentín?
 I'd love to see yours. How are you surprising your Valentine?


Monday, January 25, 2016

Freebie: Stickers Imprimibles para tu Agenda / Printable Stickers for your Planner


¡Lo prometido es deuda! A continuación comparto con ustedes, mis queridos lectores, los stickers que diseñé y estoy usando en mi Agenda/Planeador de este año, llenos de color y de buena energía. Podrán encontrar títulos para señalar viajes, compras, eventos de estudio, ejercicio, así como iconos y espacios libres para escribir tus propias categorías. 
They're finally here! Next I'll share with you the colorful stickers I designed and am currently using in my 2016 Planner/Agenda, to fill it with good energy. You'll find titles to separate trips, shopping, studying activities, workouts, as well as icons and blank spaces to write your own categories.

Si eres de quienes les encanta decorar sus agendas o cuadernos con stickers y colores puede que este descargable sea perfecto para ti. Recuerda imprimirlo en papel adhesivo tamaño carta (Lo consigues en las papelerías). Próximamente vendrán aún más sorpresas, ¡Recuerda seguir mis redes sociales para no perderte nada! Twitter | Facebook | Instagram | Google + | Bloglovin
If you like to decorate your planner or notebooks with colors and stickers, this printable may be perfect for you. Remember to print the file in a letter sized sticky paper sheet (you can find it at most craft stores). There are many other surprises coming soon, so remember to follow my social networks to keep up with everything! Twitter | Facebook | Instagram | Google + | Bloglovin


Sin más preámbulo, aquí están los links: Stickers en Español / Stickers en Inglés
Without much further ado, here are the links: English Stickers / Spanish Stickers

Recuerda que estos archivos son para uso personal de lectores de Carolinae.com, no para reproducir ni compartir mediante links diferentes a los de esta publicación. Tampoco están destinados para la venta. Si se los quieres recomendar a alguien, comparte esta publicación. ¡Ten un buen día!
Remember this files are for personal use only, for readers of Carolinae.com. These are not meant to be sold, reproduced or shared outside the links of this post. If you want to recommend these to a friend, share this post. Have a great day!

Sunday, January 10, 2016

Kiut - Agenda 2016


¿Algo básico para escribir #NuevasHistorias? Una agenda. La primera vez que usé una agenda Kiut estaba aún en el colegio, debo confesar que siempre me ha gustado ese estilo fresco y femenino de la marca. Pero este año en particular me encantaron los diseños. Compré uno de sus diarios-planeador para el 2016 y lo personalicé con unos fabulosos stickers, ¡Me encanta!
A basic thing to write #NewStories? A planner. This is my weekly planner for 2016, It's from Kiut -as in cute- and I love it's fresh-feminine style, as you can see I personalized it with a few fabulous stickers and I loved it!

Esta agenda-diario-planeador y los stickers los conseguí en Panamericana, también conocida como mi tienda favorita del país.
I got the planner and the stickers from my favorite local store (Panamericana), but you can get pretty similar ones at Michaels if you're in the USA.
'Carolina' no cabía, así que usé mi otro nombre :)
'Carolina' didn't fit so I used my other name :)

Decir que me demoré 5 minutos poniendo los stickers es demasiado, fue súper rápido y el resultado es... bueno, pueden notarlo :)
It was extremely fast and easy to place the stickers, and the result is... well, you can see :)


Me gusta porque:

  • Es compacta y ligera
  • Puedes ver toda la semana al abrir una pagina
  • Tiene lindos mensajes, stickers y un amplio espacio para notas al final

What's not to love?

  • It's small
  • You can see the weekly spread once you open it
  • It has cute messages, stickers and enough space for notes at the end

Estos stickers los diseñé personalmente para usarlos dentro de mi agenda ¿Les gustaría que los subiera al blog para que ustedes también pudieran imprimirlos y usarlos?
I designed these stickers for my own planner, Would you like me to upload them so you can print and use them?

¿Ya tienes tu agenda para el 2016? ¡Me encantaría saber cuál usas!
Have you got your 2016 planner/agenda already? I'd love to know which one you're using!

Friday, April 24, 2015

DIY: Colorful Glass Bottles (Recycle) / Hazlo Tú Mismo: Botellas de Colores (Recicla)


With Earth day a couple days ago, I bet most of us have been thoughtful of how we take care of our planet. Today's post is a DIY / recycle craft that upgrades your typical glass bottles or containers to chic decor pieces that can be used as flower vases, message/card keepers, gifts, and all the things your imagination suggests! (Except for keeping drinks and food)


Con el día de la tierra hace unos días, apuesto a que muchas personas hemos estado pensando en cómo cuidamos nuestro planeta. En el post de hoy les mostraré como reciclar una botella de vidrio de manera súper fácil, convirtiéndola en un articulo de decoración que agrega color a los espacios y puede usarse como florero, para guardar cartas, como regalo ¡o cualquier cosa que la imaginación sugiera! (Excepto para llevar alimentos o bebidas)

You'll need:

  • Acrylic paint (available in craft stores)
  •  
  • Transparent glass bottle or container (Mines are from Hatsu tea)

Necesitarás:

  • Pinturas al frío ( Consíguelas en papelerías o ventas de arte country)
  • Botella o contenedor transparente de vidrio (La mía es de té Hatsu)


Let's Get To It:


  1. Make sure the bottles or containers are clean, and mostly dry, a couple drops of water won't matter if the paint you're using is water based.
  2. Pour the acrylic paint inside the bottle/container. If it's too thick water it down a little beforehand.
  3. Move the bottle in all directions until the inside is totally covered, if you need more paint, add it.
  4. Once it is completely covered in the inside, put the bottle upside down to let the leftover paint drain.
  5. After a while, place them horizontally in an open space to let the remaining paint dry. Clean the residue.
¡Now you have some super cute bottles!

Manos a la Obra:

  1.  Asegúrate de que las botellas estén limpias y bastante secas, aunque un par de gotas de agua no afectarán si la pintura que usarás es a base de agua.
  2. Vierte la pintura al frío o acrílica en la botella, si está muy espesa, agrega un poco de agua antes de usarla.
  3. Mueve la botella en todas las direcciones para que la pintura corra en el interior y cubra completamente. Si necesitas más, agrégala.
  4. Una vez esté completamente pintada en el interior ponla boca abajo sobre un papel y deja drenar el exceso por un momento.
  5. Después, ubícalas horizontalmente en un lugar abierto para dejar que se seque . Limpia los residuos.

¡Ahora tienes unas botellas muy bonitas! 

Xo, Carolina.

Get more pretty content, follow me around!

Obtén más contenido, sígueme!!
Facebook  |   Twitter   |   Instagram  |  Bloglovin

Monday, March 2, 2015

DIY Stylish Dry Erase Board / Hazlo Tú Mismo: Tablero Borrable Casero


Personalizing our workspace is encouraging, and having a dry erase board helps us keep organized and visible notes. The ease of this will amaze you!
Personalizar nuestro espacio de trabajo es motivador, y tener un tablerito borrable nos ayuda a hacer mantener en orden y a la vista anotaciones rápidas e importantes. Te va a sorprender lo sencillo que es de hacer.


You'll need:


  • Picture frame
  • White or pastel colored paper


Necesitaras:


  • Marco para fotos
  • Papel de color claro

Place the paper in the picture frame and that's it, you can write over the glass as many times as you like. You can personalize the background paper by dividing sections on which write. As always, creativity is the limit.
Simplemente pon un papel claro de tu preferencia de fondo y listo, puedes escribir sobre el vidrio y borrar cuantas veces lo desees. En el papel de fondo también podrías dividir secciones sobre las cuales escribir. Como siempre, la creatividad define el límite.

Xo, Carolina.

Get more pretty content, follow me around!

Obtén más contenido, sígueme!!
Facebook  |   Twitter   |   Instagram  |  Bloglovin

Monday, November 3, 2014

Greek Yogurt + Parsley Face Mask / Mascarilla de Yogurt Griego y Perejil


I love to take time to pamper myself, and share the things that work the best for me. Today I'll share with you the recipe of a homemade face mask that amazed me, and left me with a flawless, clear skin. I hope it does the same for you!
Me encanta tener tiempo para mimarme, y compartir las cosas que funcionan mejor para mí. Hoy compartiré con ustedes la receta de una mascarilla casera que me sorprendió, dejando mi piel perfecta. ¡Espero que también les sirva! 

You'll need/ Necesitaras

  • 3 parts Greek Yogurt
  • 1 part Parsley

  • 3 partes de yogurt griego 
  • 1 parte de Perejil

Just add both parsley and greek yogurt into a blender, it should take like 5 minutes to blend well until it turns into a green paste, and there you have it, a couple scoops of this will cover both face and neck. Apply to your previously washed face and wait for it to dry completely.
Sólo tienes que añadir el Perejil y el yogurt griego en la licuadora, Licuar durante 5 minutos, hasta que la mezcla se convierta en una pasta verde y ¡Ya lo tienes! Un par de cucharadas de esta mezcla cubrirá rostro y cuello. Aplícala sobre la piel limpia y espera a que seque por completo. 


The parsley is know by its whitening enzymes, while greek yogurt contains lactic acid, which will remove dead cells while providing nourishment to your skin. You'll get a purified, clear, conditioned complexion as a result. Always make sure you're not allergic to any of the ingredients. This mask can be stored in the fridge for a couple days.
El perejil es conocido por sus enzimas blanqueadoras, mientras que el yogurt griego contiene ácido láctico, el cual eliminará las células muertas a la vez que proporciona nutrientes a la piel. Obtendrás una tez purificada y acondicionada como resultado. Asegúrate de no ser alérgica a algún ingrediente. Esta máscara se puede almacenar en la nevera durante un par de días. 


Will you try it anytime soon? I've got more face mask recipes HERE!
¿Vas a probarlo pronto? Tengo más recetas de mascarillas AQUÍ!

Xo, Carolina.

Get more pretty content, follow me around!

Obtén más contenido, sígueme!!
Facebook  |   Twitter   |   Instagram  |  Bloglovin